Monday, June 27, 2011

Mod Podged Lampshade

 Remember the hanging lampshade from my little brown lamp makeover  scroll to end of post  that I was considering giving a makeover?  I did it! I got some more fabric and Mod Podged the other lampshade in my craft room.
Here it is before-
Here is a closeup of the shade. Lovely, but boring.

Here she is now! Drat I meant to straighten the pic!  Tilt head slightly to the right.. good!

Do you love it? I really messed up cutting it and had to do some stretching to get it just right. I had intended to take the fabric all the way to the top and bottom to cover up the white trim, but... well.. measure twice cut once went through my head about a million times AFTER I cut it. Still, I really love it. It certainly adds interest to the room. I did end up Mod Podging it after all. I just broke out a bigger brush. I only used one coat this time and used a glossy Podge. Because its fabric its not really shiny.
Here is another with the flash on so you can see it with the wall color, which in reality is closer to the red on the lamp than it appears.

Now on to my next project. Working on my "baby" girl's room. Those stripes that I thought I would love are getting on my nerves. Stay tuned for improvements on it. Here is what it looks like now, on a good day. Typically she is my little messy girl.


Wednesday, June 22, 2011

Old Metal Crate Updated

Remember that old metal crate that I acquired?
Fun and rustic all on its own, but I added some burlap. Ok, its not as neat as I thought it would look, but its alright.

For now it is in my craft closet dresser. I am using it to hold my ingredients for my "make it yourself" products, until I find the perfect basket to fit there.


Friday, June 17, 2011

Photo Friday

I took this picture in March 2009. Not sure if you can tell or not, but it is actually a lake and the silhouettes are my daughter and nephew who were throwing stuff into it. I was uphill from them which gave it a unique effect and I took this without a flash, hence the silhouettes. I think if I cropped the reflection of the trees on the lake out, it would look like I was the one on the bottom of a hill and they were facing me  at the top with a big sky behind them.


Wednesday, June 15, 2011

Piano Makeover

This is a pre-blogging days project, but since I now have a blog I want to take the opportunity to brag some more on this makeover.
Several years ago I was given a piano. Funny story actually. I wanted a piano really badly. I dont actually play, but took lessons as a teen and it was a very relaxing thing for me to sit down and play, even if it was a simple beginners song.  I knew there was no way we could afford one after looking on different web sites, in papers, etc.. and seeing how much even an old used one would cost.  Finally in frustration I prayed.. "God? There is no way on earth I can purchase a piano and I really would like one. Can't you just give me one? Lord please lay it on someones heart to give me a piano". I never told anyone about my prayer. I kid you not on this folks, but a few weeks later a co-worker of my husbands gave me this piano. She was going to sell it to us at first, then said we could have it! A sweet lady I had never even met. It had been sitting in her garage for several years because she wanted to restore the finish and her husband was pretty tired of looking at it.

Look y'all, if you are going to ask God for something, be specific. This picture actually makes it look pretty. It was a super chippy, dirty nasty off white color, but underneath the lid was a beautiful dark finish wood. It also had real ivory (and possibly ebony, not sure) keys. There was one or two pieces of ivory missing, but the lady who gave it to me found them and I was able to glue them back on.
Well, I didnt want to re-paint it so I took to the task of stripping off that nasty paint. I did a lot of Googling on how to strip paint off of a piano and even how to do some light repairs.  I used a spray on paint remover and formed a very close relationship with a scraper. Super fine steel wool dipped in a mixture of half denatured alcohol and (I think it was) half lacquer thinner was suggested somewhere online and what a great job it did.  I used an old toothbrush to get into the fine details like this. Though you can see in the corners of the flower petals that I didn't get too concerned with it.

I carefully took it apart, even removed the keys.  I had to strip the paint off of the brass hinges and teeny screws too.
 The person who painted it even got some on the keys which I scraped and lightly sanded.  Here is a picture of the work in progress. I really wish I had taken more pictures back then.
It took me 2 full weeks of working every day on this thing in the nasty, hot, southern summer heat of my garage. I cleaned up the inside,  learned how to repair a slipped jack and even repaired a ... something or other that I forgot the name of. I replaced some felt pieces too. On one of the keys I found a date... lovely me I forgot what it was, but I remember it was just a few years into 1900. Maybe like 1904 or some such. I am guessing it is a little over a hundred years old, but I cant find anything about it online. This is the only label on it anywhere. The brand decal came off with the paint.. yep the turd that painted it did so right over the decal.
I gave it a couple coats of stain to match the existing color that was under the lid and used a wipe on poly to protect it.
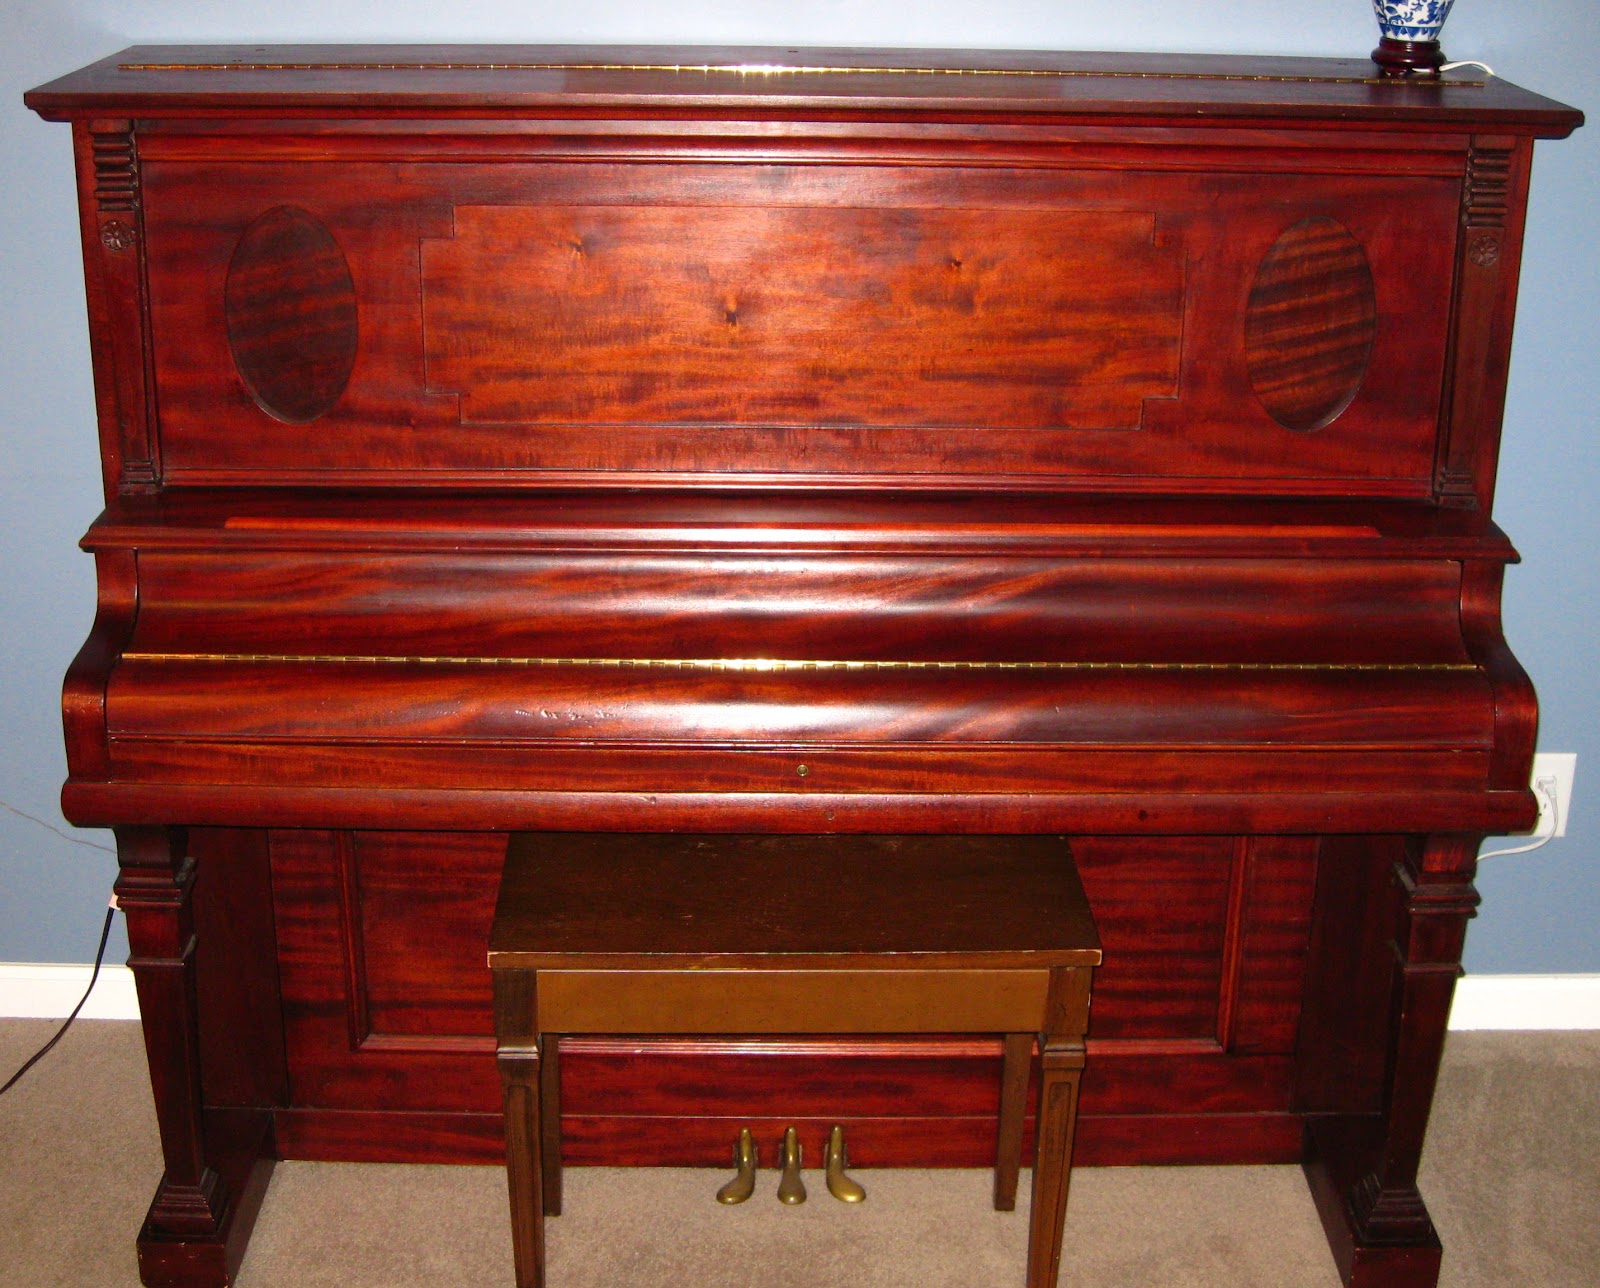
And here, my friends, is the fruit of my labor!

I feel guilty every time I see it, because I haven't played it very much, but oh how proud I am of my accomplishments! It needs a good tuning. Its actually in pretty good tune with itself though for all that its been through. The babies and kids sure love playing with it though. (this is a nephew pic taken several years ago)
I need a proper piano bench/chair. My mother-in-law gave me this organ bench. It works for ok, but its too tall (hubby was suppose to cut down the legs) and the seat is not long enough for playing comfort.
Look at that beautiful wood! I matched the original color almost perfectly.
See the chipped up keys? I dont mind. It gives it character. Reminds me of my tooth that I chipped when I was little.

And that's that! Now, I have seen some super cute pianos in blogland that have been painted. Just saw an adorable red one the other day, still I cant help but cringe when I see them. I dont think the effort comes across in this blog, but it was a huge deal to get this piano looking like this. So my suggestion is, think really hard before you paint your furniture. Wood in this great of a condition really shouldn't have been painted over. Laminate? Plywood? Paint your heart out! Real wood never goes out of style, in my opinion. Paint colors do.

Friday, June 10, 2011

Photo Friday

Some of you have seen this before, but I am sharing again. This is another oldie from May 2008. The little girl that is not paying attention to the teacher... thats my baby. She kept looking for me in the crowded room and I she found me. This picture always makes me smile.


Thursday, June 9, 2011

Easy Drawer Ribbon Holder

Just a simple organizational project today. I decided to use one drawer in my craft dresser just for ribbons. Now, I don't use ribbons a whole lot so this works very well for my small stash. I just used cafe curtain rods. I think if I had it to do over again I would have used tension rods, but these work fine.
I just screwed the hardware right into the sides of the drawers. I had to use shorter screws than those that came with it though.  To add or remove a spool you just lift it off of the pins that the rods rest on.
That's it! An easy storage solution for my ribbons.

Monday, June 6, 2011

Little Brown Lamp Makeover


So I have this little brown, boring lamp. Actually I have the little desk (?) one, a floor lamp and 2 bigger table lamps. They all came in a set on clearance at Home Depot about... oh... 11 years or more ago. Plain, but with sweet lines. Though the shades are quite bland.

I wanted a turquoise lamp in my craft cave and I was not willing to pay $40-$60 for the cheaper ones I found. So, I decided to replace the shiny silver, equally as boring one that was in there with this one  and paint it. I chose a spray paint color simply called "Aqua".
I gave it a couple of coats and I think I must not have shaken the can so well, because some of it looks bubbly and sandy like. Being the lazy crafter that I am I left it alone and just turned that part of the lamp to the wall.
With that painted I decided to give a little attention to the plain Jane shade. I Mod Podged (glossy) some leftover fabric from my wallet project right on top of the old shade.  I didnt take any pictures of that because there are plenty of tutorials on how to cut the fabric and re-cover a lamp shade. Like this one. Which is basically how I did mine, but I decided to Mod Podge instead of breaking out my spray adhesive, which is too messy for me.

 I used 1 coat directly on the shade, add fabric, and then 2 coats which I sanded lightly after the last coat dried. Be sure to iron your fabric before the MP. I dont know if any fold lines or wrinkles will smooth out or not so be on the safe side. Unless of course messy is the look you are going for. 
The shade still looked like it was lacking something, so I added some bead trim that I got super cheap at Michaels several years ago. ahh Perfect! 
 Now the whole thing


I have a hanging lamp on the other side of my room which I had used the trim on a few years ago when I bought it. So now its matchy matchy!... almost
This shade was on a big lamp from my grandparents house. It still had the plastic on it giggle  So it was nice and clean and dustless underneath. I'm just not that into the tone on tone floral pattern. You can sort of see it in this picture.


I will need to buy some more fabric but I held up what I did have and I like it. I like it a lot! I dont think I will be Mod Podging that one though. I will have to break out the spray adhesive for this big guy.
I'll post a picture as soon as its done.
Now go spice up your lamps. Its a cheap, easy, and fun makeover.

Linking up to:

Visit thecsiproject.com


Saturday, June 4, 2011

Baby Bird

Ok. I know its not a Photo Friday, but this picture I took yesterday was too cute not to share.
We have some Phoebes that built a nest in the corner of our porch. I caught this little baby resting his head on the side of the nest. Awwwwwe! Isn't it the ugliest cutest thing you have ever seen?


Friday, June 3, 2011

Thursday, June 2, 2011

Pearly Diamond Potty Room Paint

  I couldnt think of a title for my post. Sorry. This is the best I could come up with.
So.... I dont think I have ever shown you any of my decorating, and for a good reason. I am not really that good at it. I tend to use things that I already have laying around and just reuse them. I decided a few years back that I just dont want meaningless knick-knacks that I have to dust... I hate dusting! See!
tsk tsk tsk... dont judge now

When we built our house I did all the painting (and priming and caulking and ceilings and trim) and I picked out several different colors. We have yellow, brown, blue, red, green. But strangely my most favorite room is my guest/kids bathroom. Its just black and white... with brown floors (that I hate) and cabinets.
This is also the most put together room that I have. All the rest of the house? I am still scratching my head. While I still have small changes to make for this potty room, I just love the way it turned out.
I decided that for this room I wanted diamond shapes on the wall. I didnt want the pattern too crazy so I thought I would do a tone on tone. I found some pearly white craft paint at Michaels and that is what I used for the diamonds which are painted over Ultra Pure White by Behr Premium Plus.
One of my to-do's is to move that TP holder since this is the first thing you see when you walk into the potty room.
For the diamonds I knew that I wanted half of one at both the top and the bottom and 3 whole ones in between. So I measured the wall above the baseboard to the ceiling and divided that number by 4 (thats 4 diamonds total if you make both the halves a whole). That gave me the height of each diamond from tip to tip. I made a simple template from a cardboard box. For the half diamond I just cut the measurement in half and made a triangle which worked for both the top and bottom. Does this make sense?
I am sure there would have been a better way, but I just traced those templates onto the wall with a pencil. I was so not going to tape the whole room off. It turned out pretty well despite the fact that you can sort of see the pencil marks... its all good. Then I filled in the pencil sketched diamond and triangles with my pearly craft paint. I used a brush and it left brush strokes, so I tried to make sure they all went up and down. It gives it character.. yep thats it.
I kinda went with a French theme too. I dont know why now, but I like it.
The picture below is actually just a frame that I took the backing out of and painted the wall side of with black paint. Now that I have a Cricut I think I will re-do it since the crown came out kinda messy.
If Google translate is right it says something like "The Throne Room", because my mom sometimes called the bathroom that and I thought it was funny.
The shower curtain I made. I got the fabric for super duper cheap. It has a more cream color to it, but I am ok with that. French Toile and Houndstooth.. I love the combo.
This is the sink mirror. I took a lovely mirrored tray and hung it up with some sturdy twill tape. I simply hung it on a screw just above the edge of the sink mirror. Thats another project I would like to do.. frame out the boring builder grade mirror.
Boy you can really see the diamond paint pattern in this shot. Depending on the angle, sometimes you can barely see the diamonds. Especially in low light.
Here is another mirror shot.

And another shot because I have it. That black window mirror was once gaudy gold. A nice bit of spray paint made it fit in quite nicely in this bathroom. Its sister I painted white and hung it in the master bath... for now.
 There you have it. My favorite room in the house.
I was thinking of painting the ceiling a light, metallic gray color. I saw a shade I like by Martha Stewart. I dunno. What do you think?


Visit thecsiproject.com