Monday, May 30, 2011

Non-toxic Lotion Bar Recipe


I was in Target one day and came across a lotion bar. Now I had never seen such a thing and so I thought I would Google it and see if I could make one myself. Preferably with Shea butter since I had a few recipes I wanted to make with it. I came across a very simple one from MadeOn. She doesnt have the recipe there anymore, but she does show how to make it from the kit you can buy from her, or if you dont want to make it, she sells the bars.
I am going to show you how to make them yourself. Its super simple to do and only requires 3 ingredients. This is going to be just like when I made my lip balm. Same organic ingredients even. Just a different mold and ingredient weight.

Non-toxic Lotion Bar Recipe:
 5.5 oz Coconut Oil
4.25 oz Beeswax ( see my beeswax tips)
4.25 oz Shea Butter

Now this makes a lot of bars. I gave several away and still have plenty left and they last a long time, so you may want to cut this recipe in half .
I used a kitchen scale to measure out my ingredients.

Its as simple as melt all ingredients together. I start with the beeswax since it takes much longer to melt then add the shea butter and coconut oil. For my bars I used a glass measuring cup placed inside a pot of simmering water. (Just like my lip balm) A wooden skewer makes a great disposable stirrer.
Once they are all melted you can add essential oils. I added some Frankincense and Myrrh.
Then pour them into the mold of your choice. I got a soap mold from Michaels for a couple of bucks.
I still had lots of liquid left so I filled up a mini muffin tin, which made a nice size.

Let it cool completely. As it does it will harden up nicely. I think I let the ones in the soap mold harden overnight because they were so big. The mini ones were ready much sooner. To release from mold, pop into the freezer for a bit and they should come right out.
To use simply warm up the bar by rubbing it in your hands then rub on skin. I love to use it on my heels! Great for eczema, psoriasis, dry hands, feet and elbows or all over. Now I dont typically like the all over the body feeling but it sure makes your skin soft so its great in the winter when my eczema flares up. You could probably even use it on your face if you have super dry skin. It feels greasy at first, but will absorb nicely.
Use caution if you store this in a hot climate, car, purse... The Shea Butter and Coconut Oil have a very low melting point ( between 72 and 76 degrees)
Hope you enjoy this wonderful non-toxic lotion bar. I am still looking for the perfect non-toxic soft lotion recipe, but when I do find it I will share. Thanks for reading.
The "freckles"" on top of the bar is my Myrrh resin that didnt quite mix in so well. No harm, it works just as nicely.


Friday, May 27, 2011

Wednesday, May 25, 2011

Vinyl Door Decor

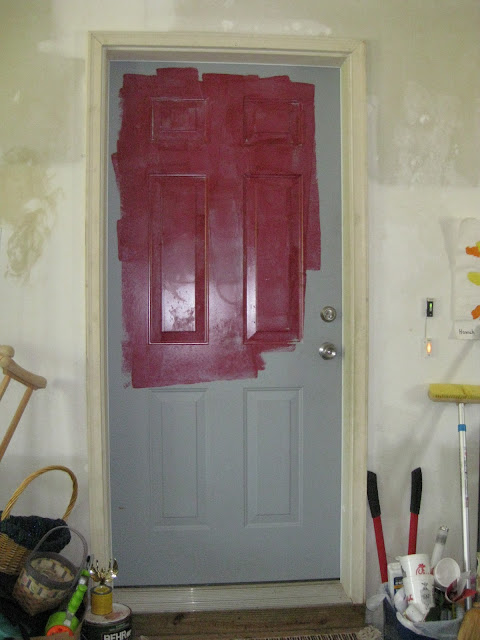
In January 2009 I wrote a post about some organizing I had done. At the end of the post I put up some pictures of things to do. One of them was to finish painting the door in my garage red. At the time of the post it had already been sitting like this for 2 years.

Its not that I started painting it and didnt finish. I just used the door to clean off my roller from another door I had painted... gee how lazy. If you have ever painted any large object red, you know what a pain red is to paint, and how many coats you have to do. I hate painting. So I put it off for 4+ years. I had some really great excuses... really... ok I didnt. This post is dedicated to my little sister, who by the way was going to paint that door for me.. see! Good excuse! She never did so...
The other day I decided to finally tackle that door and here she is. ahhhh
I even painted the trim! While I had the white paint out I decided to paint the other side of the door. It went from this:

To ... ta-da!
It makes the room feel so much bigger.

Well really the motivation for painting the red side was because I wanted to use my Cricut, and try out the Sure Cuts A-lot software I had ordered for it.
And let me just say right now that if you have a Cricut, you NEED to get SCAL! It will save you hundreds (or thousands) of $$$$ on cartridges. Check it out, and here is a special link (I just found out I can get a little referral fee if you use my link)
Here is my first attempt. I cant say that I LOVE it, but I like it enough for now. Wishing I had spaced the words closer together though.

Awe, I do feel welcome thanks! I used plain white contact paper to cut it on. Seems to be holding up just nicely. It kinda distracts you from seeing this (on my husbands side) when pulling up into the garage... 

While I was at it I made house numbers for the front door. Before:
And after:

Makes it much easier to see from the road. Which is pretty far from the street.
Thats it! Thanks for reading.

Tuesday, May 24, 2011

I Was Featured!

My Burlap Pegboard was featured over at Knock Off Decor! YAY! Please take a minute hour (or two) to check out all of the amazing knock offs at this fabulous site. There is so much inspiration there for items you would find in a magazine made cheaper by folks like you and me.


Monday, May 23, 2011

A really big, really messy drawer

Its the little things, like this big ole messy desk drawer (its gotta be about 2 feet+ long), that when organized makes me oh so happy!
I promise I didnt mess it up to make it look like that.
OK, so this was pre-blogging that I did this, but it made me so happy that I had to take a picture. Since I saved the pics for so long I decided to share the happiness with you all. Surprisingly this drawer is still just as neat, and the only thing that is nice and neat in my hubby's man cave/office.
HOORAY for organization!

Friday, May 20, 2011

Foto Friday

Spring 2009 - Runway Traffic 
I caught this out of the window while waiting for takeoff from Denver to Atlanta.
Not sure why, but I love it and it makes me giggle.


Sunday, May 15, 2011

Book Plates and Lending System : for your personal library

Several years back my incredibly talented Sis-in-law made me these awesome bookplates for my books.

They not only told the person that borrowed it who the rightful owner was, but also had a card in each one that I could take out and write the name of the borrower, title, author, and date they "checked it out" of my library.
Here's my library in case you are wondering why I would need such a thing (and haven't seen this picture already). I have 2 more 3-shelf book cases on the opposite wall.
I suppose I will do another post and tell you how I organize them, but for now...
Because I have all of these books, the ones my SIL gave me didnt go far, and I needed more. Lots more! For some reason at that time I decided every book I owned needed it. Now I just put them in the ones I actually lend.
To make your own you will need library pockets and lending cards. Mine were purchased from my local School Box. The pockets come in super fun patterns and plain colors. The ones my SIL made were black. Very classy and I love them. But School Box no longer carries them in black. I was using the plain manila ones but recently got these!
My favorite so far. For the personalization I have used shipping labels for the printer and printed it up that way. I have also used a card making program so that I could add pictures and print them up, several to a page, on card stock, then glue to the pockets.
The ones above I outlined with a pink marker to make it stand out. 
The back of these pocket are self stick. Some of the plain pockets come without sticky tape. I always add more of my own anyways to be on the safe side.
Peel and stick to the inside front cover of your book. Personally I like to add it to the right hand page in paperbacks because it feels better in the hands when reading.
Add your info to the library card and add to your pocket. Remove it when you lend the book to a friend and keep it in a safe place.
I keep mine in a pencil box along with a pen, the extra pockets, and tape.
Here are a few that I have made over the years.
There you have it. A super simple and attractive way to label your books and keep track of those you lend.


Linking to:


sew many ways

Friday, May 6, 2011

Photo Friday

Spring 2009- Somewhere between Wyoming and Montana


Wednesday, May 4, 2011

Fancy Hat

Last week my church had a Mother/Daughter tea. We were encouraged to dress up in a hat and gloves. Well, I happen to love to dress up and dont get many opportunities to, so I was all for that. Not wanting to spend 30 plus bucks on an ugly plain hat, I set off to make my own... because I love trying new crafty things. Since I didnt know what on earth I was doing this tutorial is not very good. Still, I thought I would give you a couple of the steps I did to make my own hat.
I found Buckram in Hobby Lobby. Probably not thick enough for a true Milliner, but it worked for me. I got a yard (maybe and a half) of it to play around with. I also bought a $2 straw hat that I was going to spraypaint and glue flowers and feathers too just incase it didnt turn out so well. I ended up using it as a pattern. I traced the brim onto 2 layers of buckram.
Side note: Cool thing about real straw hats is that they can be sprayed with water and shaped. I pushed in the top of mine because I was going to do something that I cant remember.
So I have a toilet seat looking piece now and then I cut out a circle in the middle, big enough  to fit my head, for the crown. I may have used the straw hat as a size guide too.
On the outside edge of those circles (remember I used 2 layers of buckram) I zigzag stitched some floral wire onto it. Floral wire because I didnt have any milliners wire, and it was it is pretty stiff wire. Green yes, but it didnt show in the final product.  I then cut some more buckram, about a 2 inch wide strip and whip stitched it to the wired circles. Hey! This looks like a pillbox hat!
 I also wired the brim, but I added the wire between the two buckram layers. This came in handy for shaping the brim. I wanted it to dip in the back and arch on the side.
I then covered the "pillbox" crown and brim with my fabric. A lovely Swiss dot-ish looking white fabric. I used Aleens tacky spray adhesive because I had it. Hard to tell here, but thats the fabric. Found it at Hobby Lobby also and bought a yard of it.
 Next day I sewed the crown to the brim. Around the edge of the brim I sewed on some white bias tape to cover the raw edges and wire. I then decided I liked the look of a black trim around the edge, but I had already bought white and sewn it on. I had some black, but it was narrow, so I only sewed it onto the top of the rim right on top of the white bias tape. (seriously lacking in pics because I had given up on a tutorial by now)
In this pic you can sort of see under the lacy netting where I took a sheer,wired, black ribbon and tacked it around the crown of the hat to hide the seam where it met the brim.

I then decorated it with stuff I had in my craft closet. The netting I had already and just sort of covered the brim with it and tucked the ends under the ribbon around the crown. I used more of the ribbon to make a sort of bow. I knew I wanted a flower too, but the black flowers in Hob Lob were ugly and looked like death. The white Lilies I got didn't look as good as I hoped. So I Googled how to make fabric flowers and that is what I came up with. I love it! I also added some long, skinny feathers that I had to give it some movement, and because fancy hats should have feathers. I didn't glue any of the embellishments on just in case I wanted to take them off later on down the road and change the look.
What do you think? Not too bad for not having a clue what I was doing!

Ooooh, I also won a prize in the "fashion show". A gift certificate to Charming Charlie, a jewelry/accessory store where everything is separated by color. Makes me so happy.


sew many ways