Showing posts with label tutorial. Show all posts

Tuesday, January 24, 2012

Toiletpaper Tissues

I found something the other day, while browsing the internet, that made me say...duh! Of course I didn't bookmark it.. duh.. and now I can't find it but it was so smart. Maybe it was something on Pinterest? Anyways, this person took an old tissue box and put a roll of toilet paper in it to use as tissues. Now maybe I am slow and you all are saying,  duh Lizzy! That is soooo last year! Well, it was new to me. I have had to resort to using toilet paper as tissues before, and maybe that is all you use to blow your nose, but this made it seem more sophisticated. I had to try it. Here is what I did.

Take a roll of toiletpaper and cut out the tube in the middle. I used my fingers to loosen it up a bit first so I didn't cut the toiletpaper.

Those are my awesome $4 blue, flannel snowflake pants. Yay for sales! I also got a bright green pair :)

Now pull out the tube,  It came out quite easily, and ooooo look! Select-a-size tissues! A size for all sorts of snotty/boogery situations.

Instead of reusing an old tissue box, like the post I read did, I used a metal tissue box cover I had picked up at Big Lots last year. It was super cheap.. maybe $2. I like box covers for my tissues because I can't stand it when you get to the end of the box and you go to pick up a tissue and the whole box comes with it. The cover keeps things where they belong, on the table/counter/dresser...etc. Also, it works nicely to cover up that roll of toiletpaper! See! The roll is a perfect size.

I could probably even get one of those massive jumbo rolls and it would fit. This roll is big and one step down from jumbo.

Well, there you have it. Simple. 
 I didn't do the math, but this should be cheaper than a box of tissues (up to 10x according to something I read). Of course it depends on the brand you like to use. I don't like John Wayne toiletpaper (rough and tough and don't take no crap from nobody) so I get Charmin Strong.  I always hate to buy tissues because of the price. I wish I had seen this a long time ago.

Oooh! I just thought of something. You could use this instead of a toiletpaper holder if you have one of those awkward bathrooms that have no place for a paper holder and your only option is the back of the door... or whatever.

Thanks for reading to the end,

Saturday, January 7, 2012

Homemade Foaming Hand Soap


Last year I decided to start making my own non-toxic health and beauty products. I made my own face cream,  lip balmlotion bars and sunscreen. Of course I still make my own laundry soap too.

I intended to write this post for nearly a year now but I have also been making my own hand soap this year. I started off making my own liquid hand soap, but I didn't like it so much. Mostly because I used scraps of soap I had laying around and it smelled funky. Plus I just didn't care for the consistency of it. It was like the goo from a snot flower. I don't know the real name, but growing up in Florida we had these purple flowers in our yard and when picked there was a clear goo in the middle.. like snot... but clear. Ok. so.. right then. Here is what it looked like (the soap that is).
 The Farmers Nest blog has a great tutorial on how to make liquid soap from a bar. I didn't bother Googling how to make mine so it wasn't very fabulous. I really wanted to use it in a foaming pump dispenser stretching it even further. It just didn't always dispense all that well from the foam pumps and needed to be shaken a lot. So I decided to try another method.

First off you will need some foaming soap pumps. I had done some Googling on foaming pumps and most everyone said the ones from Bath and Body Works were the best to be had. Well I didn't want to spend a lot of money for their soap just for the containers so I searched for cheap foaming pumps. Turns out it was  just cheaper for me to get the B&B soap.  I had been receiving daily (grrr B&B) email from them and in one they announced a clearance sale online with free shipping on a $20 (or $25 maybe) order. So I got right on there and ordered 10 bottles because I needed 3-4 and what if one or two broke? I now have spares.
I had thought to just use the soap in it then gradually refill it with my homemade stuff, but that Twisted Peppermint stanks! (sorry to those who love it) I can't deal well with artificial fragrances as I get headaches/migraines and allergies flare up.  It also contains Triclosan, as well as other stuff I don't need to get clean,  and I want to avoid that in my products.
So I just emptied it out, saved it for a while because it seemed wrong to pour it down my drain, or throw it away. Eventually decided to pour it out and.. where was I? Oh. So I poured it out peeled off the labels and cleaned up the sticky residue with Goo Gone (love) and then soap and water.

Next, choose a liquid Castile soap that you love, or make your own if you want. This is way easier.
You all probably know of Dr. Bronner's but there is another cheaper one (like $6 less a bottle) that I found out about just after like within minutes and I couldn't change the order I ordered the Dr. Bronners that I actually like better. It is called Dr. Woods. You can get Dr. Bronners just about anywhere. My local grocery stores sell it and so does Target. It is several dollars cheaper from Trader Joes if you have one. My TJ's only had peppermint, sadly. Those above are the 3 that I have acquired. I prefer the Dr. Wood's. It may be because of the shea butter in it, but it seems nicer to me. Both are organic, so yay!
You could even find a plain castile soap and add essential oils to make your own smell if you like.
I bought my Lavender and Dr. Wood's from Vitacost.com . I love that site as they have very good prices on vitamins and lots of other stuff.

Once you have your soap picked out fill your thoroughly clean dispenser about 1/4 to 1/3 full of castile soap. In mine it was about 1/4 cup or 2oz. of soap.

Finally,  fill the rest of the bottle with water, but not all the way up to the top. Leave about an inch for the pump. Shake it up and enjoy. Thats it. Super simple. Can't believe it took all of that writing for such an easy recipe!
 Note that this will not be as slippy and slimy as your normal soap. It will get your hands clean though and you will get used to the feel of it. I did add a dash (didn't measure) of vegetable glycerine to the one I made for this tutorial just to try it out. It may help take away that feeling that I am having a really hard time describing. Its like.. your hands are stripped of all moisture and they drag.. does that even make sense? Only they are not dry. I use this soap because my kids and I get eczema hands and this soap makes a big difference.

I figured out that this soap costs me $0.56 a bottle. I am telling you friends, you seriously should consider making your own products. This is way cheap. I think you can get even cheaper if you use bar soap melted and heavily watered down. Even with having to purchase the bottles (about $2 for me) it is cheaper than buying it. The best part is that the ingredients are non-toxic and gentle on my skin.
One way to save is if you have a friend who uses B&B foaming soap ask them for the bottles that they most likely throw away. Then direct them to my blog so they can  make their own soap.. after you have gotten a few bottles that is. I didn't have any friends so I had to buy mine.

Guess what? You can also use this as dish washing soap (Not dishwasher!).
Also, I re-used a Kandoo foaming shampoo container and the kids use this concoction as shampoo and even body wash! Its gentle so you could wash your face with it also. I haven't actually tried that yet but it says on the bottle you can. Yay for multi-purpose items!


I hope you will give this a try.


Friday, December 30, 2011

Easy way to make pom-poms

I thought I would show you how I make pom-poms like the one I made for my recycled sweater hat.
First I cut a piece of yarn from the same yarn I want to make my pom-pom out of. Cut it about 6-8 inches long. Next slide it between your ring and middle finger like you are flossing your teeth. This will be used later to secure the pom-pom.
Next start wrapping the yarn around your fingers a million times or until it is very thick. Be careful not to wrap up the yarn you flossed your fingers with. A heavier weight yarn (thicker) will work up quicker and take less yarn than a light weight one.  The one I used for this tutorial is a bulky weight (#5) washable wool. It just depends on the look you like. I found that the thicker yarn gives it a fluffier appearance.
When your fingers are nicely cocooned in yarn, cut it from the skein/ball. Now take the two loose ends of your finger floss and bring them up to the top of  your fingers like so.
 Either get a willing person to tie it into a VERY tight knot for you, or gently slide it off of your fingers and tie it yourself. This is what you will end up with.
 Now take your scissors and start cutting the middle of the loops all the way around. This picture shows half of the loops cut.
On this pom-pom I chose to keep the 2 ends from the finger floss long so that I could use them to tie the finished pom-pom onto the top of my hat. You may need to trim up any longer than average ends on your pom-pom. If you don't need the tie just trim it to match the other strands of yarn.
Its really super quick and easy. I made a bunch the other night while watching Netflix. Made with my fingers they are about 3 inch sized pom-poms. Just use less fingers for smaller sizes. No need to buy a pom-pom maker!

Thursday, December 29, 2011

DIY Hat and Mittens From an Old Sweater

I have a pin on Pinterest from MarthaStewart.com. They used an old wool sweater and made mittens from it. I thought it was a great idea so last time I was in Goodwill I found a sweater that was half off and gave it a try. I am pretty sure the sweater was under $2. Here is a blurry picture of it.
 The Martha Stewart one tells you to wash the wool to felt it. Mine is cotton so that won't happen, which is fine with me. I decided to use the sleeves to make my mittens.  and to make them long to keep my wrists warm.
First I cut off the sleeve to a length an inch or so longer than I wanted the mitten.
 Then I cut out a mitten shape . I put my hand in the sleeve and cut around my fingers and thumb leaving about a half inch or so for a seam.

Next I used turned the pieces right sides together and used my sewing machine to stitch around the raw edges. I started with a zigzag stitch but I think a straight stitch works better. I decided to use my serger to finish off the edges but it will work just fine with just your sewing machine if you don't have a serger. Though I must say that I love my serger and think anyone who likes to sew should own one.
Sadly I didn't take many pictures of the mitten making process. I was in a hurry to make them and leave the house.  I did a little more cutting and sewing around the wrist on the thumb side to make it more fitted. Sorry.. this tutorial stinks, but you get the idea.
Here they are done.
 Pretty cool huh?
This next one you can see where I shaped the thumb side wrist part. It feels more snug now.
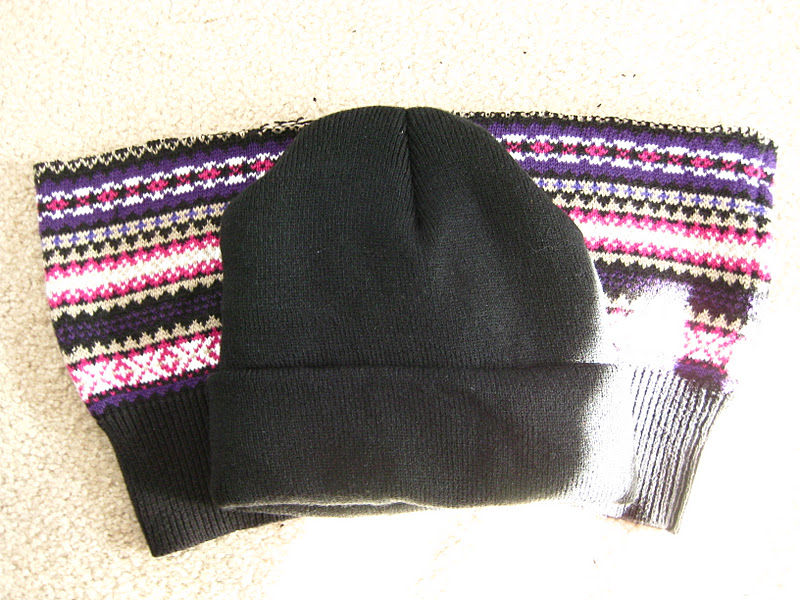
That done I decided that I would try to make a hat with the bottom edge of the sweater. I cut off a chunk from the bottom and used my husbands hat as a guide for cutting it out.
As with the mittens I just serged around the raw edges, wrong sides together. I also sewed a ... I guess its a dart in the top. Like the store bought one in the picture above has.  Here is what it looks like from the inside. It just gives it a more rounded appearance.
The "darts" are the bumps at the top and bottom and the left and right are the seams from where I sewed the 2 halves together. Does that make sense to anyone but me?

I made a pom-pom for the top and here is the finished hat.
 I have a huge head for a girl so I don't think it looks all that grand on me, but its a pretty cute hat.
The sweater I bought was a ladies small and here is all the sweater I have left.
You could make hats and mittens for the whole family with a giant mans sweater! ... And a wreath and pillows!
Yay for upcycling!

Wednesday, November 2, 2011

Autumn Sweater Wreath

How is it possible that it is already November ?  Its crazy how quickly this year has flown by. (It was crazier yesterday when I started this post) Next thing you know it will be New Years, and I just hung up an Autumn wreath on my front door yesterday!
Only, I cant figure out how I like it... and I really don't like it at all. I like the idea of it though. See, I had this sweater, which I wore every fall, that I absolutely loved. It got a hole in the armpit and I tried to fix it with my serger, which made it even worse and unwearable. It had been sitting in my craft closet for several years because I didn't want to throw it away. Then recently I saw where someone had taken a thrift store sweater and made a wreath out of it. I knew that would be the perfect thing for my beloved autumn sweater.  I took a straw wreath  and added a hanger to the back with floral wire.
I used an upholstery needle (curved like a "c") and twisted some floral wire into the eye. 
Then I chose a spot on the back, inserted the needle, which comes right back up to the back side, and twisted the ends of the wire together. I had to use pliers to pull the wire and needle through.
Then I pulled the wire so that the twisted together ends were inside the wreath. See?

I wanted the wreath form to have some bulk so I used straight pins and pinned on some batting all the way around the form.
Next I cut off the sleeves from my sweater and cut open the sleeve near the seam. This way I could wrap it around the wreath form and sew it back together on the back side of the wreath. I just pinned it in place first all the way around to keep it straight.  I used a whip stitch, but really you could just pin it well with pins and be done with it.
I just couldn't decide how to embellish it, and with the pattern it seemed too busy for anything, but too plain without something. I did take a bunch of old flowers and leaves I had and added a small bouquet to the middle and moved the bow. I think I like this better.
Hmmm. Maybe I should shorten the dangly bits of the bow. What do you think? Any other ideas?
I thought about some felt flowers, but the one I held up to it kind of disappeared against the pattern.
  I used the rest of the sweater and made a pillow from it. I save old ugly pillows for just such a purpose and so I just sewed up 3 sides and cut off the extra bits of sweater. Then I stuffed it with the old pillow and sewed up the side. The side seam ended up being the old, finished bottom edge of the sweater so I didn't bother tucking any raw edges under. Just sewed right across the seam. It would be cute, with some chunky, brown buttons but I didn't have any.

Awe. Now on to a new Christmas wreath. I probably should think about that before Christmas is over.


Linking to:

Todays Creative Blog

Monday, May 30, 2011

Non-toxic Lotion Bar Recipe


I was in Target one day and came across a lotion bar. Now I had never seen such a thing and so I thought I would Google it and see if I could make one myself. Preferably with Shea butter since I had a few recipes I wanted to make with it. I came across a very simple one from MadeOn. She doesnt have the recipe there anymore, but she does show how to make it from the kit you can buy from her, or if you dont want to make it, she sells the bars.
I am going to show you how to make them yourself. Its super simple to do and only requires 3 ingredients. This is going to be just like when I made my lip balm. Same organic ingredients even. Just a different mold and ingredient weight.

Non-toxic Lotion Bar Recipe:
 5.5 oz Coconut Oil
4.25 oz Beeswax ( see my beeswax tips)
4.25 oz Shea Butter

Now this makes a lot of bars. I gave several away and still have plenty left and they last a long time, so you may want to cut this recipe in half .
I used a kitchen scale to measure out my ingredients.

Its as simple as melt all ingredients together. I start with the beeswax since it takes much longer to melt then add the shea butter and coconut oil. For my bars I used a glass measuring cup placed inside a pot of simmering water. (Just like my lip balm) A wooden skewer makes a great disposable stirrer.
Once they are all melted you can add essential oils. I added some Frankincense and Myrrh.
Then pour them into the mold of your choice. I got a soap mold from Michaels for a couple of bucks.
I still had lots of liquid left so I filled up a mini muffin tin, which made a nice size.

Let it cool completely. As it does it will harden up nicely. I think I let the ones in the soap mold harden overnight because they were so big. The mini ones were ready much sooner. To release from mold, pop into the freezer for a bit and they should come right out.
To use simply warm up the bar by rubbing it in your hands then rub on skin. I love to use it on my heels! Great for eczema, psoriasis, dry hands, feet and elbows or all over. Now I dont typically like the all over the body feeling but it sure makes your skin soft so its great in the winter when my eczema flares up. You could probably even use it on your face if you have super dry skin. It feels greasy at first, but will absorb nicely.
Use caution if you store this in a hot climate, car, purse... The Shea Butter and Coconut Oil have a very low melting point ( between 72 and 76 degrees)
Hope you enjoy this wonderful non-toxic lotion bar. I am still looking for the perfect non-toxic soft lotion recipe, but when I do find it I will share. Thanks for reading.
The "freckles"" on top of the bar is my Myrrh resin that didnt quite mix in so well. No harm, it works just as nicely.