I have been putting this post off for a while. I figured that my 100th post should be super special. Since I can't figure out a super special project that I have done which is worthy of #100 I just decided to post a few pictures of things I have made. They are not worthy individual posts for each one, and probably not of post #100.
I may not post again for a few weeks. I will be leaving in one week for England and I have been super busy preparing my household for my departure. Gahhhh! I can hardly stand the excitement!
Here is a bag I made. I had hoped to bring it to England with me, but it just isn't as comfortable as I had hoped it would be, which it has to be if I am going to tote my camera around in it. Look how cute it is though!
I love this big button. I found it at Hobby Lobby near the curtain rods.
I just made a pattern by tracing a bag I bought online. Super simple.
Next up, a tutu I made for my friends baby. I just used elastic and spool tulle from Hobby Lobby.
Take the desired length of elastic and sew ends together. I have no idea what age child this will fit, and since she wasnt born yet I just guessed. Slip knot lengths of tulle around the elastic. I did pink, orange, pink, orange, etc. Another super simple project.
I might have to turn one into a lamp shade.It might work. hmmm.
I found this 5 light, crystal chandelier at Lowes for only $75! Down from like $300. I snatched it up. I decided to hang it in my daughters bedroom for now. She said she would like it better if it had pink on it, so I bought some plastic "crystal" beads and made my own dangles. She loves it!
And finally, I re-covered a wrist pin cushion to match my sewing room. It was a navy gingham. Just a scrap of fabric, hot glue, and a ribbon. Cute.
I am headed to England in about 17 days. This will be my very first time leaving North America. I am so crazy excited that I want to go pack my bags right now. OK..... I actually already started putting my toiletries in travel size bottles and packing the ready ones in my quart size zippered bag.
I am going with 6 other ladies in my church bookclub. We plan to visit all sorts of places, including some Jane Austen tours, towns and museums, castles, gardens, old houses. We are visiting Glastonbury Tor because we read the book. "Glastonbury Tor". Should be so neat to see it. Our schedule is jam packed and we will be there for about 10 days. Eeeeeeeee! I cant wait! Look at the cottage we are staying in!
I will be taking tons of pictures, no doubt, so I will be carrying my DSLR as well as my little purse size camera, along with lots of memory cards. I bought (yes I know I could have made it) this bag insert, and I believe it will work nicely. I plan to put it down in the bottom of a big sack like purse.
Now I dont know about you, but I hate those neck straps that come with cameras. I jazzed mine up, but to me a neck strap gets in the way and I never really used it. I thought a hand strap would work much better for me. I dont care to carry it around my neck, and get punched in the gut every time I take a step. I also dont care to scream tourist.
(Oh mercy I can't believe I just posted this pic of me)
I considered buying a hand strap but then in the back of my mind I recalled seeing directions on making one on Photojojo... please visit that site if you love photography stuff. They ROCK!
Their directions for making a "Dashing DIY Handstrap" are super easy to follow and super easy to make. Here is my new strap.
Man its hard to take a picture of my right hand holding a camera with my left hand and trying to make it look good.
I bought black webbing and took their suggestion to add ribbon. I just used Crafters Pick- The Ultimate to glue it onto the webbing. Fabulous stuff!
I found the slide at JoAnn in the notions section. It was gold so I spray painted it black to match. I decided to go with the metal slide because it seemed more sturdy to me.
Here are a few things I did differently. I decided to use a cotton webbing instead of polyester. Its much softer on my girly hands. Since I used cotton I couldn't melt the ends. Instead I dipped the ends in Mod Podge. It worked perfectly!
In their instructions they said to use a 1/4 inch, 1/2 inch long bolt. It took lots of searching (they had a bazillion nuts and bolts), but I found these at Lowes and they are 1/4 long. Also, the top is nice and flat. I didnt need to use the nuts and washers that they recommended since my bolt was shorter.
See! Nice slim profile. I think I like mine better than theirs.
It was so fast and easy to make. I know it was only a few bucks (or less) for materials, I just didnt take the time to add it up. Thanks for checking it out.
Can you believe its already September? Craziness! The leaves are already starting to turn ... and since its been so hot and dry, they are already falling from the trees. It is starting to look like fall, but sure feels like summer.
This Fridays picture is one that I took in October, 2009. It is of the grist mill at Stone Mountain Park. Such a lovely spot, and one of our most favorite picnic spots in the park.
Thank you so much to all who entered my very first giveaway. It sure was fun. I really wish I could have given away a free software copy to everyone.
I let Random.org decide the winner. Every comment has a number next to it and here is the number that Random.org chose.
And the winner is....
Erin Cook! Erin I will be contacting your email soon with your prize information.
For those of you who didn't win. So sorry. If you would like to purchase a copy of the My Memories software, My Memories has given me a coupon code to share with you. This coupon code provides a $10 discount on the purchase of the MyMemories Suite v2 scrapbook software. It also comes with a $10 coupon for downloads. (total value of $20!). This code is only good for My Memories Suite v2. It never expires so please use it, pass it on to whoever you like. Visit My Memories here and use this code - STMMMS97510 (copy and paste to avoid typos).
For those who are interested, here is a video for more information about what you can do with this program.
Just a reminder: Today is the last day to enter the My Memories Suite, software giveaway. It was rated #1 by Amazon for digital scrapbooking software.
Dont forget to do all/some of the extras for additional entries into the contest. Leave a separate comment for each one. For example: "I 'like' your blog on Facebook" or "I follow My Memories blog"
Be sure that I have your email address so that I can contact you if you win. You can always add it to the bottom of your comments like so- fordjunkstuff (at) gmail (dot) com
The winner will be chosen either tonight after midnight or tomorrow morning. I will post the winner tomorrow, August 30th.
I love my ironing board. Its huge and so wonderful for ironing big pieces of fabric. Unfortunately the fabric was all stained and nasty and just plain boring.
I knew I could make my own, but figured it would be too much trouble. A few weeks ago I decided to see how the old cover was attached. I noticed that it was just a cord that was threaded through the serged edges of the fabric, pulled tight, and wrapped around that little green thingy you see below.
Ok. Easy peasy! I can do this! I pulled the cord out of the old cover to reuse. I then decided that I really liked the fabric of some curtains that used to hang in my craft room that I just wasnt in love with there. It is a thick but soft and durable fabric that would be perfect for my ironing board. So I smoothed out the old fabric as best as I could (I really wanted to iron it out but..) and used it as a pattern for the new cover.
You can see how nasty the old cover was? I just pinned it down and cut out the basic shape. Next I used my serger to finish off the edges. I then took the old cord and threaded it through the serger stitches on the new cover.
I used this double eye bodkin to pass the cord through the stitches. My mother-in-law bought me some at Jo-Ann. I usually use it to hide the tale ends of serger stitches back into the stitches.
After it was all threaded I placed it on the ironing board and pulled and pulled then fastened with the green ... thingy. Here it is now
A super cheap redo and another thing to cross off of my to do list. Yay!
oh.. I just realized that I need to re-cover the little hideaway sleeve board too ( its tucked away in this shot) awe man!
If you havent yet, I would like to ask you all to check out my My Memories software give away. Only 2 people have entered so far :(
Here is a quick little project that I made with the My Memories software. I forgot to share it on the giveaway post.
GIVEAWAY HAS ENDED! For your convenience all links open in a new tab
Its my very first give away, and I am SO EXCITED!
First off let me tell you about this awesome digital scrapbooking software that I have been playing around with for the past few days. If you know me, or have read my "about me" section, you would know that I am not a scrapbooker. I don't have the patience for it, and all the papers and embellishments would take up precious space in my fabric closet. HOWEVER (you saw that coming right?) I was given the opportunity to try out digital scrapbooking and I love it! Oh great. Now I have another craft hobby!
So I downloaded the software, which was super easy, and got right into the simple to use, My Memories Suite program.
Ok. As a disclaimer, I have no idea what to do when it comes to scrapbooking, and I don't know the rules.... if there are any. With that in mind here is something I whipped up using the free papers, embellishments, and such that came with the software. Don't judge too harshly. I'm a noob.
Here are a few pages from a small album I made with pictures from my 2009 annual Mother/ Daughter retreat. A getaway that my sisters, sis-in-law and mom take every fall. I never do anything with the pics and I think My Memories is perfect for organizing the fun times we have on these trips.
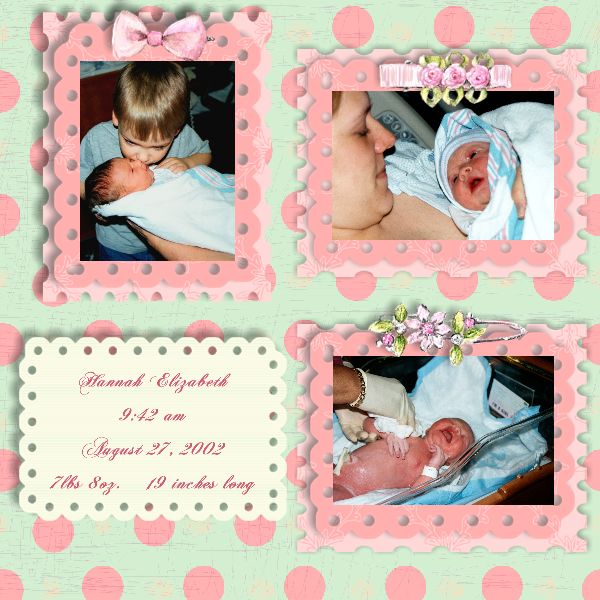
I probably should have done this first, but here is a pre-made template that was also available with the program. This sweet baby girl one was too cute.
Seriously... that child cried so much I decided I was done making babies.
The My Memories Suite software is much more than digital scrapbooking. You can make calendars, photo books, cards, you can add music, videos, web links, share it with friends and family... fun! You can buy different paper packs and pre-made templates and embellishments from them also. I could play with it all day, but I really wanted to share this with you before a month passed by and I was still sitting in this chair playing. So I thought I would add this somewhat cheesy video to show you all the other wonderful things you can do.
Alright. Here is the SUPER EXCITING PART! My Memories is giving one of you lucky duck readers a free download of the My Memories Suite, Digital Scrapbooking Software. For freeeeeeeee (make sure you read that like Adam Sandler in Bedtime Stories. Go back and read it again if you didnt.. its makes it much more exciting). That's an almost $40 value.
How, you say, can I enter?
Please visit My Memories. Browse around, come back here and leave a comment telling me what digital scrapbooking kit you like. This is a must. If you don't do this you don't get entered into the contest.
Want extra entries? Of course you do! I am going to give you several ways. Leave a comment that you did so for each of the following extra entries.
*Become a public follower of my blog. If you are already a follower, thank you, and just comment telling me so.
*Follow (or be a follower of ) my blog on Facebook .
*Tweet about this blog post.
*Follow My Memories blog
*Facebook,
* and Twitter.
Be sure to leave a separate comment for each extra that you did so you have multiple entries.
This contest will end Monday, August 29th at midnight (EST). I will use Random.org to determine the winner. On Tuesday (30th) I will announce the winner.
Be sure you have an email address connected with your comments. If you use Blogger or Google, just be sure that your email address is enabled. I believe you can post with other types of accounts also, like Wordpress. You can always add it to the bottom of your comments like so- fordjunkstuff (at) gmail (dot) com
For all of you un-lucky ducks, or those of you who don't want to enter the giveaway, but like what you see. My Memories has given me a coupon code to share with you. This coupon code provides a $10 discount on the purchase of the MyMemories Suite v2 scrapbook software. It also comes with a $10 coupon for downloads. (total value of $20!). They have a dollar section, so you could make that $10 stretch. I am all for that! This code is only good for My Memories Suite v2. It never expires so please use it, pass it on to friends and family, blog, Tweet and Facebook about it and have fun. Here ya go! Visit My Memories here and use this code - STMMMS97510
I was given my own free download of My Memories Suite, but my opinions are all my own... and I will give them too, don't ya know.
Another astrophotography picture. This is from Fall 2009. I really do love astrophotography, but its hard to do here most of the year because of the humidity. Being outside at night in the cold is no fun either.
I love taking a pictures of Earthshine. Thats light reflected off Earth onto the dark side of the moon (the grayish part you see in this moon pic). You dont always see it with the naked eye. Usually I just see the Crecent Moon shape, but with the camera it takes on a whole different look. I love it.
In my last post I told you how my husband and I made bathroom mirror frames using left over boards, from the contractors pack that I bought, for my dining room re-do. Well, my hubster was going to throw away several good size scraps and I rescued them. So glad I did because I decided they would be perfect for a project that I had been thinking of doing for a while now. A rack to hold my non-heirloom quality necklaces and hook earrings.
I started off with just the necklace rack and decided an earring rack would be great too. I found a long-ish board from the scraps that thankfully had straight, not mitered, ends. I had a pack of 100 brass cup hooks that I have had.. pretty much forever. What on earth? So I pre-drilled almost 50 teeny holes into the thick end of the board and screwed in the brass cup hooks. I spray painted it first, and added a second coat to cover the shiny brass cup hooks.
I did the same with the earring holder. I just used some small eye hooks that I had in an old picture hanging kit. I spaced them all about a forefinger width apart. If I did it again I would have spaced it maybe an inch apart instead. This works though.
After the paint dried I screwed them into the wall. I marked the studs but they were in a weird place so I just used a stud for the center of the boards. For the necklace one I used a long screw in either end and just screwed right into the drywall. Its working quite well.
I decided to hang them in my closet. There was a long wall without shelves and I figured it was a the perfect place for them.
Thats it. Super duper simple. Incredibly cheap because it was made from leftover parts and ancient hardware. The fun part was hanging up all of my necklaces and earrings.
Boy, most of these picture are pretty crappy.
Of course I had to hang everything up in almost Rainbow order. Yay!