Monday, February 20, 2012

Picnik Replacement! - iPiccy

My friend sent me a link to a blog that links to a photo editing site. This site is called iPiccy. Its in beta right now so it has some kinks to work out but for now its a great alternative to learning Photoshop. Whew! Its a lot like Picnik and appears pretty easy to use.
Thanks Google for stabbing us all in the heart when you announced that you would be closing Picnik! I know several of you are upset about that also so I thought I should share this with you all. Pass it on, blog about it, shout it from the rooftops!

One downside I see so far with iPiccy is that you can't save a bunch of pictures and then work on them later, or even stop in the middle of one and shut the web page down. I was trying to edit a picture and it crashed on me. Very frustrating, but forgivable since its beta.  Perhaps I will have to save the picture often if I am doing extensive editing. At least until they work out all of the kinks.

I thought I would share a little of what they have to offer over on iPiccy. Here is a picture of one of the cutest kids in the entire world. My nephew James. It's not really the best picture to show off his cuteness. We had just finished eating  a picnic lunch and he was walking around with his hands in his pockets and chocolate on his face. Not too bad, but lets see if some editing can improve it.
Original photo

Here I have done a little with the contrast and , my most favorite tool I like to use when editing, local contrast. Local contrast seems to (I cringe to say this because I hate the overuse of the word) make everything pop. I also took most of the chocolate off of his face with the clone tool and brightened up his eyes. He has amazing blue eyes like his mommy.
Better
That's nothing you couldn't do with Picnik, but there are some pretty neat functions in iPiccy that Picnik didn't have. Like these!


I think its best in B&W

Check it out. See what you think. Its pretty simple, user friendly and free. No registration required.

Cons:
-Seems a bit slower than Picnik.
-Not as many functions.I paid for premium on Picnik and it was way worth all the extra functions. This may not be a con for you if you just used the free functions though.
-You can't make collages, which is ok with me. I use Picasa and can do that there. 
- Some of the effect functions caused the program to crash on me. Frustrating if you have just done a bunch of tedious corrections. 


Saturday, February 11, 2012

Dressed Up Chocolate Bar

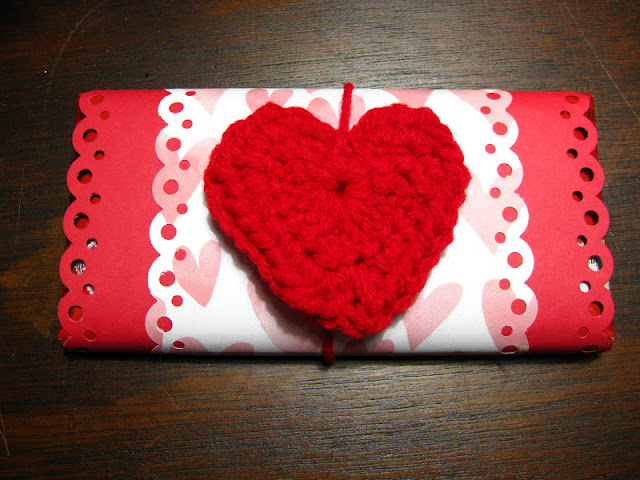
This is a very simple Valentines Day project. I have seen lots of people do this type of thing so it isn't anything new. It was super easy and it only took a few minutes.

Get your chocolate bar. I got a Chocolove bar because I thought it fitting for Valentines day. Plus I am a chocolate snob and Hersheys is nasty junk. I only buy it for making s'mores.

 Cute!
 This is really good chocolate too. I got the super extra dark one, 77% cacao, for myself and it was fabulous. I found this brand at the Dekalb Farmers Market (Atlanta). I haven't seen them in grocery stores so I am not really sure where to find them. Sorry.

Next, I cut a piece of red card stock to fit around the bar. I also printed off a heart patterned paper and cut it slightly smaller than the red. I wish I knew where I got the heart pattern from but I can't remember. If you don't have heart card stock you can just Google "heart pattern" and find several images to print. I taped these tightly around the bar, but not to the chocolate wrapper itself.


 I cut the edges with this Martha Stewart paper punch. Love that thing!


Then I crocheted up a super quick heart from some red yarn I had. Here is the pattern I used from Planet June. Great instructions! I made the medium sized one. It took maybe 5 minutes tops!


 I used the tail end of the yarn to make a loop big enough to fit around the bar. It can be taken off and used as a little ornament.
 And here it is all together. Simple. Cute. Yummy!


Happy Valentines Day!


Linking to:
Visit thecsiproject.com

Monday, February 6, 2012

Spring Pom-Pom Wreath

So I made a pom-pom wreath. Super easy and a nice way to use up some of the yarn in my stash.

I started with a large straw wreath that I had bought half off at Hobby Lobby this Fall.  Then I wrapped it in some pink fabric from my fabric stash. Not necessary, but I didn't know if all that hot glue I was going to be adding to it would melt the plastic that was on the wreath and I didn't want to take off the plastic because straw wreaths are messy. Nothing fancy, just glue it on and cover up all of the straw.
 I am ashamed to actually be posting that picture, but it was the only one I had. :-/
Next I made a bazillion and one pom-poms with my finger wrapping method, and hot glued them on. I tried  to glue them on so that no two exact colors were right next to each other or too close together. I wanted a random look so I didn't line them up directly next to each other either.. well some of them were like in the above pic.
That's about it. The only pain in the butt was making those pom-poms. I guess it wasn't a pain so much as boring. I did make most of them while watching Netflix though so that helped.
 I think if I ever did this again I would probably use a smaller wreath. Maybe 12inch instead of 18inch.

I used 5 different colors of yarn. Any more and it may have been a bit too much....or maybe it is already?

 I am pretty pleased with it. I thought to hang it like you see on my front door. Only I couldn't keep it there permanently because I was imagining how hot it was getting already and the bugs that might like to make their homes in the softy-wofty pom-poms. Mainly wasps. eeek! It only stayed on the door long enough to take these pictures.


Hmmm. What do you think? Does it need something else? I just felt like adding anything else might make it look overboard. Am I right? I dunno.


Linking to:

Visit thecsiproject.com