Pages

Saturday, July 30, 2011

Photo Friday...on Saturday

Well I totally forgot about Photo Friday, for the past 2 Fridays, so I thought I had better not wait another week and post one today. Saturday.
This is a picture I took recently. I have never seen such a pimped out bug before. Isn't it the coolest?
Its a Golden Tortoise Beetle - Charidotella sexpunctata
You can see my reflection (mostly the camera)on it! I am the big blob and the little blob to the right is my daughter. So neat. I found out these like to eat Morning Glory leaves (thats the leaf it is on). I dont mind since they are such cool bugs and Morning Glory vines are a pest also.
Here is another. You can see that its legs and head aren't sticking out in this shot, hence the Tortoise in their name. 

On another note. My Shabby Apple knockoff dress made the top 10 over at The CSI project. YAY!
Visit thecsiproject.com


Thursday, July 28, 2011

Shabby Apple Knock-off

I just love the dresses at ShabbyApple.com. I am sure most of you know about them.  When I saw this dress I fell in love!
Photo from shabbyapple.com

However, I just cant justify spending almost $100 on a dress that will probably only get worn a couple of times a year. I just kept drooling over it though and finally thought. Hey! I bet I can make my own for much cheaper. I started off looking at patterns and found one I liked from McCalls. Its pattern #M4769. Now having sewn this supposedly simple pattern I can say that its a pain in the rear to do the collar, and there is a lot of hand sewing.. like the entire bottom hem and lots more, including all the buttons.  You may want to look for a better pattern if you make this. The instructions are poorly written and the illustrations are not much help when it comes to the collar. If any one wants this pattern. I will send it to you. No joke. I am done with it.
After I found a pattern I (thought I) liked I searched for the fabric. I couldnt find it locally, and so I Googled a lot. I finally found what I was looking for on Ebay. I wanted the navy gingham, but it needed to be a one inch check to look like the inspiration dress. Almost everything I found was under 1/2 inch, or not the right blue. The fabric I got is still a little lighter blue than I wanted, but it works.
Next up was the shoes. I did a quick search and found some super cute ones at Payless. Sorry to say they no longer have them. The only thing is they are red with white dots, but I think it works.
So now after weeks and weeks of putting it off, and 2 solid days of sewing, here is my dress!

OK. I know. I am about 12 sizes bigger than the Shabby Apple model and probably 10 inches shorter, but I just LOVE my dress! I was rushing to finish sewing it up so I could post, but I need to make some adjustments. Its a little too big up top :(
I dont really know if I like the shoes with it. I think I like these white ones better. I really want a less vibrant read sash too, and maybe one made out of satin. This was all I could find at my Hobby Lobby. 
Here I am inside with white shoes and the sash tied in back. Not a very good backdrop. I wish it were like the Shabby Apple dress pic with a sea in the background instead of a sea of books. 
oop. my slip is showing eek!
I bought some red tule last week because I want a red petticoat. I think it may look cute under this dress too! I'll have to get to sewing on it soon. 

The nice thing is it only cost me less than $20 to make the dress.
Thanks for dropping by.

Linking to:
Visit thecsiproject.com


sew many ways


Saturday, July 23, 2011

A New Roof

On March 26th we had the worst hail storm I have ever seen. It was actually quite fascinating. I always enjoy seeing hail, especially when its hot weather (yes it was summer like in March), so I was standing at the windows watching it. When I realized that it was getting harder, I shoved everyone out of the way and ran to the front door to capture this video.

Ok, the blogger quality really stinks and it added a chirpy noise, but you get the massiveness, and loudness of this storm. When it cleared up I went out and took some pictures.


I heard there were baseball sized hail down the road. It stripped the trees nearly bare and there was a lovely pine scent to the air when it was all over. Smelled like Christmas. Several weeks later I was driving down the interstate and enjoying the bright green spring of the trees when I came to a section where the trees all looked like it was still winter. I realized it was from this storm.
 
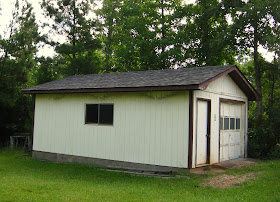
  Within minutes of the storm passing there were roofer wars going on all over our mailbox. One would put up a flyer and another would come along and take it down and put up his own. Blue tarps and roofer signs were seen everywhere. Now our house is only 5 years old (nearly 6 now) so my husband didnt think anything was wrong. I was concerned with the old outbuilding that came with our property. 
 Well, we did nothing about it, until the appraisers came to appraise the house for a refinance. They noted that we might have hail damage because quite a lot of folks in the area suffered damage from the storm. We couldnt get it refinanced until an inspector came out.. blah blah blah now we have a new roof. The old shed is really the only one that needed to be fixed, but apparently our shingles werent properly installed when our house was built so the roofer we chose talked the insurance agent into replacing it now instead of down the road when it could possibly be worse off. The only damage we had inside was a small water stain in my daughters bedroom ceiling. We figure it was from a vent boot that wasnt properly installed. We were right. 
They finally came and installed our new shingles this week. Here are the before and after pictures.I took the before and after at totally opposite times of day, but you get the picture.

Before:
After:

We tried to stick with the same-ish color because we still loved the gray. However the roofer suggested a shingle with a bigger color variation so it looks like it has more texture. Since our property is lower than the road the roof is well seen. I just love it!  

Made me so sad to see my house with the big blue tarp on it :(


Shed -before
  After. I really want to paint this ugly beast. The new roof makes it look so much better already.
This was the best kind of makeover. One where I didnt have to do any work and the insurance paid for it. Yay!

Thursday, July 21, 2011

Dining Room makeover

Remember my first dining room and kitchen "makeover"? Its been 2 years since I did that. I cant believe it lasted that long. I really hated it.
Here is the before, before picture of the room.
Not too bad. I liked the green enough, but wanted a change. So I painted it yellow, along with my kitchen. Now, I loved the yellow I picked out, but I was trying to go for a tuscan, venetian plaster, Olive Garden type look, so on top of it I used the (obviously) wrong color glaze and it ended up looking more like a bathroom at a Mexican Restaurant. SO HATED IT! Oh and this picture makes it look good. It was awful.
Here is another.
Ahh yes. The curtains looked ok when opened, but close them and WOE!
I wanted to do a faux board and batten in here, but when I had some left over beadboard wallpaper from doing my daughters room (will post that soon I hope) I decided to just use that. I was already in the papering mood and I didnt have to wait for my husband to help with this. I also still loved the original yellow under all that faux crap look so I just repainted it the pretty yellow.
Notice the ceiling? Ya, I hate to edge, so I kept getting yellow on the ceiling. In frustration I decided to paint it yellow also instead of breaking out yet another paint can. I really love it! Its one of the reasons we got smooth ceilings when we had the house built.
This picture below is the best shot I got that represents the true color of the room. Its a yummy, buttery yellow that looks good in all light. The name? Pale Honey in satin- Behr Premium Plus (the primer added one)
I took out the china hutch and it makes this super tiny room look so much bigger.
I cut the wallpaper in 5 foot lengths so its pretty tall. To top it off we bought a contractors size bundle of door casing molding. For $50 of trim we did the dining room, my daughters room, and still have 3 12ft long boards, plus several shorter pieces. Enough I believe to frame out the huge mirror in my bathroom and the normal size one in the kids. Yay! Another project! I really wanted a ledge, but this is way cheaper and I am saving up for a trip to England this fall. (stay tuned for that too)
I want to do something on this wall, but I just dont know what yet. Any suggestions? I have some old blue and white plates that were my moms that I thought about hanging up, but I just dont know. hmmm
You may have noticed that my chairs got a makeover too. I love the change! I got the striped fabric at Hobby Lobby and was able to (barely) get away with only 2 yards. I had a coupon so it only cost me $10 to make over the chairs.
Its so cozy in here now. I may possibly change out those lamp shades. I tried it without them and just dont like it.
My husband some how yanked the curtain rod partly out of the wall. Thats ok because I really want to replace it. It was an uber cheap rod from Big Lots. I found a chunkier one at Hobby Lobby to replace it with.
Here's the before and afters again.


Thanks for stopping by.


Saturday, July 16, 2011

A little more turquoise

 I have this big ole, silver frame that I got for $10 at BigLots several years ago. At one time it had a quilt square that I had made hanging in it. Then I got tired of that because it wasnt very good. This is the only pic I have of it. You can see it in the bottom 4 pictures. Haha.. look at my craft closet before it got all prettied up!
For a very long time it just sat there on the wall with nothing in it. It didnt come with glass or a backing so I never got around to getting any.  Well I got tired of people asking my what I was going to put in the frame so when I got my Cricut this year I decided to put a crafty quote. My fonts were limited (pre SCAL software) and this was my first project, so its not impressive.
Frame details
Pretty, but time for another change. Since I am trying to introduce more turquoise into the room I got brave and spray painted it with the same paint I used on my little brown lamp makeover.
Here are the results.
I really like the way it stands out from the wall now. Yay!
What a difference some spray paint makes.


Friday, July 15, 2011

Photo Friday

I just love clouds. Not sure why, but they make me happy. I took this picture in Fall 2009 while riding down I-85 toward Atlanta. Our car has darker, blue tint up at the top of the windshield so I think that's why it is so extremely blue up at the top of the picture. 


Thursday, July 14, 2011

Homemade Sunscreen

Last night I made my own sunscreen. Yep, I sure did! Did you know you could make your own non-toxic sunscreen? Ok. By now I know what you are thinking. You're thinking this right?
Thats me hugging on a tree :)
Well its not true. I would SO cut down that tree! Just teasin'..oop dont send the hate mail! 
Seriously though.  Why?  Do you know about all of the crap that is allowed to go in sunscreen? I mean, We use sunscreen to supposedly help prevent skin cancer yet there are chemicals in the commercial junk that are carcinogens!!!! Thats so messed up! Skin Deep has some great info on sunscreen. Check it out for yourself.
You already know I am trying to use only products that are not toxic to my body's largest organ (my skin of course). After searching the Skin Deep database for a sunscreen that wasn't too bad for me I came away a bit disappointed. There are only a few that are decent, and I am just not willing to pay 13 plus bucks for 4 ounces (or less) of decent sunscreen. I thought I found a sort of good one but when I ordered it the manufacturer was out of stock, sigh. So with my  little less than decent sunscreen getting to the I-need-to-cut-this-open-and-scrape-it-out phase I decided to do some research on making my own. There are tons of recipes out there! With all the choices I decided to find a recipe that calls for very few ingredients, and hopefully some stuff I already had like Shea butter and coconut oil. I knew that Zinc Oxide was a very safe product for your skin, but you cant just get it at Wal-mart. That junk that you put on your baby's butt? uhhh thats another topic, but there is petroleum and all sorts of mess in there. I needed zinc in its pure form, which I found at Soapgoods.com . I also get my Shea butter from them and a few other things.
Alrighty. Let me get to the recipe.
2 Tablespoons Coconut Oil
2 Tablespoons Shea Butter
1/2 teaspoon Sesame Oil
1/2 teaspoon Aloe Vera Gel (not the juice, this is pure gel)
Heat all the above ingredients in a water bath, a bowl inside a pot of simmering water, until melted. This wont take long at all. Once this is melted, remove from heat and stir in:
1 Tablespoon Zinc Oxide powder.
Note:
please cover your face with a mask when you use this as it can be harmful in powder form if inhaled. I didnt have a mask so I used my t-shirt over my nose.. ya know like when someone farts and you dont want to smell it?uhh ya, moving on.

Mix thoroughly and pour into a dark container. I got a cheap, blue, plastic container from SoapGoods.
This should have a shelf life of about 6 months or so. I will just make a new batch every summer since I dont need it in the winter.
The mixture will start to solidify once you take it off the heat and mix in the zinc. Here is what it looks like when cooled -
I also added several drops of lavender because I dont like the smell of the sesame oil. Which by the way I really think you could do without that oil.
Its a great creamy spread which goes on quite well and takes effort to wash off. I am perfectly ok with a white tint to my skin if it means I am being protected, but this was really not that noticeable on my white skin. If you have dark skin it will certainly show up more, but hey! Its non-toxic!
This recipe makes about 2 ounces.  I had everything but the zinc oxide so I didnt have a big start up expense in making this. I figure that 8 oz is a typical sunscreen size. If I quadrupled this recipe to get 8 oz. it would cost me only $2.45. HUGE savings and non-toxic! Hello? This is great! Plus most of my ingredients were organic, except maybe the zinc, but I dont know if that is even possible and the sesame oil. Now yours might be slightly more or less depending on your ingredients and the prices. But $2.50 for any sunscreen is excellent.
How does it work? VERY well! I used it today and got burned a little.. ok. I knew better and forgot to reapply it, but I swam for 3 1/2 hours, and dried off with a towel several times in between.  I have been more burnt by the commercial stuff when I forgot to reapply after towel drying than I did today. Plus I am fair skinned and burn VERY easily!
Will I keep using it? Definitely! I feel good enough to use it on my kids now that I tested on myself. 
I do believe you can add as much zinc oxide as you wish for a stronger sun protection, but keep in mind it will leave a white film on the skin. Also, I dont know the SPF of this. Probably around 20 the way I made it, but thats a guess.
One great thing is it will be great for my sensitive skin. I use pure Shea Butter as my everyday moisturizer. Coconut oil is a good moisturizer too. Zinc is also good for acne, wound healing, its an astringent, rashes (think diaper cream) and one of the safest and most effective protection from UV rays. I think this would make a great every day face cream for your face.
Guess thats about it. If you try it let me know how it goes for you.